Adding and editing data
The Adding and editing data functionality is at the core of Xolmis. It allows researchers to insert new records, update existing ones, and ensure that information is consistent and traceable across modules. Data entry is designed to be flexible, supporting both individual records and batch operations.
Note
To manage data, the user must have permission for that. See details in Users.
Adding a new record
To insert a new record:
- Click on the New button at the top of the window and choose the type of data you wish to add.
- Alternatively, use the Add button at the top left of the data grid in the active module.
- Both actions will open a dialog with fields to complete.
- Press Enter or Tab to advance to the next field. Once finished, click the Save button to confirm the new record.
Tip
The use of the Enter key to advance to the next field or control is enabled by default. You can disable it in the Settings, under the General section. If disabled, use the Tab key or the mouse to navigate through fields. Regardless of the setting, to return to the previous field or control, use Shift+Tab or the mouse.
Adding records in batches
Batch entry is useful when dealing with large datasets, such as multiple captures, sightings, or banding records.
Quick Entry
The Quick Entry tool (under development) allows users to insert records in a spreadsheet-like interface, enabling fast typing and bulk data input. This feature is designed especially for field teams digitizing large amounts of data at once.
Options
Click the Options button in the top toolbar to open or close the insert options panel. In the panel there are two options that control the insert behavior:
- Existing records policy:
- Ignore existing: when a record was found in the database, do nothing.
- Replace existing: replace the found record with the inserted data.
- If an error occurred while inserting:
- Abort insert: stop and undo the current insert.
- Ignore and keep inserting: record the error without stopping the insert.
How it works
- Spreadsheet interface: Records are entered in rows, similar to a spreadsheet. Each row corresponds to a record, and each cell represents a field.
- Temporary storage: Data entered in Quick Entry is automatically saved in separate files by module, ensuring that no information is lost during the process.
- Insert step required: These files are not added to the main database until the user explicitly clicks Insert records. This gives full control over what is integrated.
- Validation before insert: When inserting, Xolmis validates the data to ensure consistency and accuracy.
- Error highlighting: Cells with problems (e.g., invalid formats, missing required values) are highlighted in red, making it easy to spot and correct issues.
- Editing flexibility: Users can freely add new rows (records) or delete rows before inserting, adjusting the dataset as needed.
Tip
You can copy data from spreadsheet apps, like Microsoft Excel, and paste it in the Quick Entry grid. For that, it is recommended that the columns are already in the same order from the Quick Entry.
Benefits
- Fast entry: Ideal for digitizing field notes or bulk datasets.
- Safe workflow: Data is kept in separate files until validated and imported, preventing accidental corruption of the main database.
- Error visibility: Problematic cells are clearly marked, reducing mistakes.
- Modular organization: Each module has its own Quick Entry file, keeping data structured and easy to manage.
Quick Entry best practices
- Review before insert: Always check highlighted cells and correct errors before inserting records in the database.
- Use backups: Perform a database backup before inserting large batches.
- Incremental inserts: For very large datasets, insert in smaller batches to simplify validation.
By combining a spreadsheet-like interface with automatic saving, validation, and controlled insert, Quick Entry ensures that bulk data entry is both fast and reliable, while protecting the integrity of the Xolmis database.
Batch dialogs
Batch dialogs provide specialized forms for inserting multiple records simultaneously. Examples include batch entry of bands, feathers, or mist net effort, reducing repetitive work and ensuring consistency.
Editing an existing record
To edit a record:
- Select the record in the data grid.
- Click the Edit button at the top left of the grid (or double-click the record).
- A dialog will open containing the selected record’s data.
- Modify the desired fields and click Save to apply the changes.
All edits are logged in the Record history, ensuring traceability.
Field editors
Some fields include associated buttons that open dialogs with tools to help fill in values. These editors improve accuracy and reduce manual errors.
Find dialog
Fields with a search button open the Find dialog.
- Type your query in the search field.
- Results are displayed in a list.
- Use Up and Down keys to navigate, and press Enter or click to select.
When searching for taxa, both scientific and vernacular names are displayed.
Calendar dialog
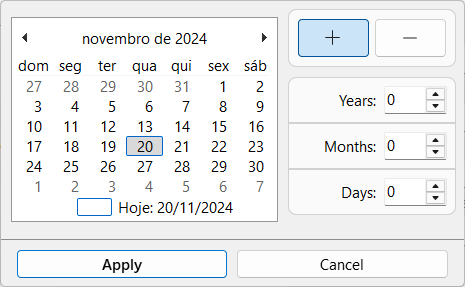
Fields with a calendar button open the Calendar dialog. Features include:
- A calendar control to navigate days, months, and years.
- A calculator to add or subtract a specified number of days, months, or years.
This tool ensures precise date entry, especially for long-term monitoring.
GeoAssist
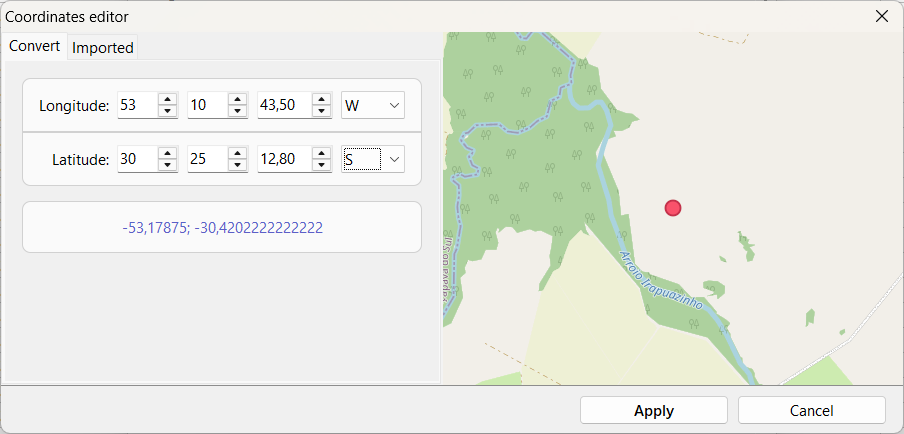
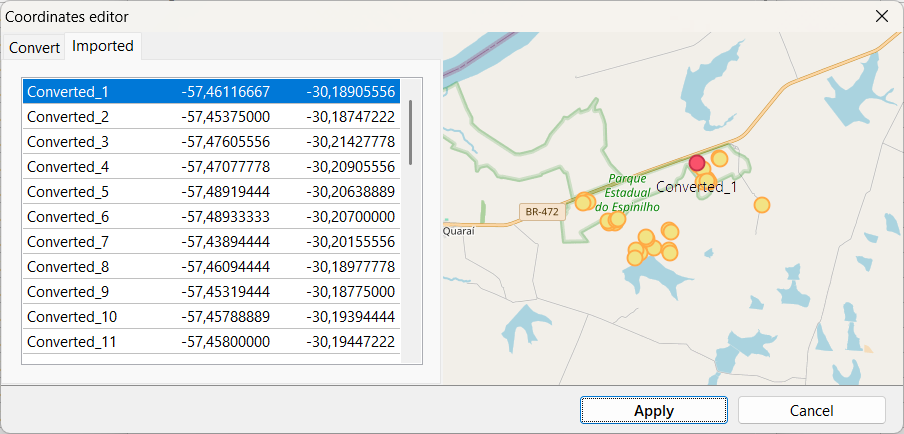
Fields with a map marker and pencil button open the GeoAssist dialog. GeoAssist provides two tabs:
- Convert tab: Enter coordinates in DMS format and convert them to decimal degrees. Click Apply to use the converted coordinate.
- Imported tab: Displays coordinates imported from files or converted using the Coordinates converter. Select a coordinate and click Apply to use it.
GeoAssist ensures geographical data is standardized and accurate.
Colored bands editor
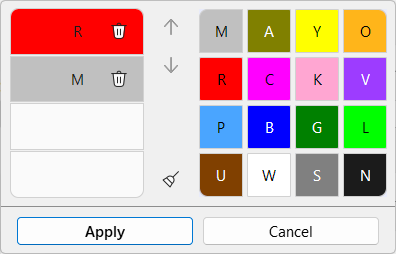
Fields with a band and color wheel button open the Colored bands editor.
- Select colors by clicking on them, following the top-to-bottom sequence.
- Remove a color band by clicking the trash can icon next to the line.
- Click Apply to confirm the combination.
This tool supports semi-automated band management and ensures consistency in color-coded banding schemes.
Multiple selection dialogs
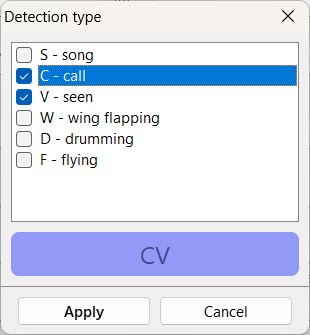
For fields that allow multiple selections:
- Choose all desired options.
- Click the Apply button to confirm.
This is commonly used for selecting multiple observers, taxa, or categorical attributes.
Data validation
The Data validation process ensures that records entered into Xolmis are consistent, complete, and reliable. Validation helps prevent errors during data entry and guarantees that datasets remain useful for long-term research and analysis.
Automatic checks
When adding or editing data, Xolmis performs basic validations:
- Required fields – Certain fields (e.g., taxon, locality, collection date) must be filled in before saving.
- Coordinate order – Longitude must always precede latitude; incorrect order will trigger a warning.
- Data types – Numeric fields (e.g., measurements, counts) must contain valid numbers.
- Date formats – Dates must follow the standard format (DD/MM/YYYY).
- Unique identifiers – Field numbers, accession numbers, and band codes must be unique to avoid duplication.
Manual checks
Users should also verify data manually to ensure accuracy:
- Consistency across modules – Link specimens, individuals, nests, and eggs correctly.
- Taxonomic accuracy – Confirm that (botanical) taxa are valid and accepted names are used.
- Measurement ranges – Check that values fall within expected biological ranges.
- Contextual notes – Add notes when data may be unusual or requires clarification.
Error handling
- Invalid or incomplete records will display error messages in the dialog.
- Errors must be corrected before saving the record.
By applying data validation, researchers ensure that records in Xolmis are accurate, consistent, and trustworthy, strengthening the quality of ornithological datasets.
Data cleaning
The Data cleaning process involves reviewing and correcting records to ensure that datasets remain accurate, consistent, and ready for analysis. While data validation prevents errors during entry, data cleaning focuses on fixing issues that may appear later, especially in large or imported datasets.
Common issues
Data cleaning helps address problems such as:
- Duplicated records – The same specimen, capture, or sighting entered more than once.
- Incomplete records – Missing values in required or important fields.
- Inconsistent values – Conflicting information across modules (e.g., specimen taxon vs. capture taxon).
- Out-of-range measurements – Values that fall outside expected biological ranges.
- Formatting errors – Incorrect date formats, coordinate order, or use of symbols.
- Obsolete records – Entries that are outdated or superseded by newer information.
Cleaning strategies
- Use filters and searches: Identify duplicates, missing values, or unusual ranges using the search and filtering tools.
- Apply summaries: Use the Summary feature to detect outliers in measurements.
- Standardize values: Ensure taxa, methods, and categories follow accepted lists.
- Merge duplicates: Consolidate repeated records into a single, verified entry.
- Update obsolete records: Replace outdated information with current data.
- Document corrections: Use the notes field to explain changes made during cleaning.
Data cleaning best practices
- Schedule periodic reviews: Regularly check datasets for inconsistencies.
- Clean after imports: Imported data often requires adjustments to match Xolmis standards.
- Collaborate with team members: Share responsibility for cleaning to ensure consistency.
- Keep backups: Always back up your database before performing large-scale cleaning.
- Verify corrections: After cleaning, validate records again to confirm accuracy.
By combining data validation during entry with data cleaning afterwards, researchers ensure that Xolmis datasets remain trustworthy, standardized, and scientifically valuable.
Best practices
- Use batch tools for efficiency: When entering large datasets, prefer Quick Entry or batch dialogs.
- Verify coordinates: Always use GeoAssist or the converter to ensure accuracy in geographical data.
- Document edits: Add notes when editing records to provide context for future reviewers.
- Standardize band colors: Use the colored bands editor to avoid inconsistencies in banding schemes.
- Leverage field editors: Tools like Find and Calendar dialogs reduce errors and improve precision.
Relation to other modules
Adding and editing data is central to all modules in Xolmis:
- Individuals and Captures – Record banding, measurements, and recaptures.
- Sightings and Surveys – Document observations and sampling events.
- Nests and Eggs – Track breeding biology and productivity.
- Projects and Permits – Manage administrative and research metadata.
By mastering data entry and editing tools, researchers ensure that Xolmis remains a reliable, consistent, and scientifically valuable repository.