Users
A user is anyone who connects to and interacts with a Xolmis database file. Each database connection has its own set of users, independent from other databases. To open a Xolmis connection, you must log in with a username and password. Every action performed in the system is recorded with the username, ensuring security, accountability, and change tracking.
User management dialog
To manage database users, open the dialog via the main menu: File → Manage users. This dialog displays a list of users registered in the current database file, along with a toolbar at the top for management actions.
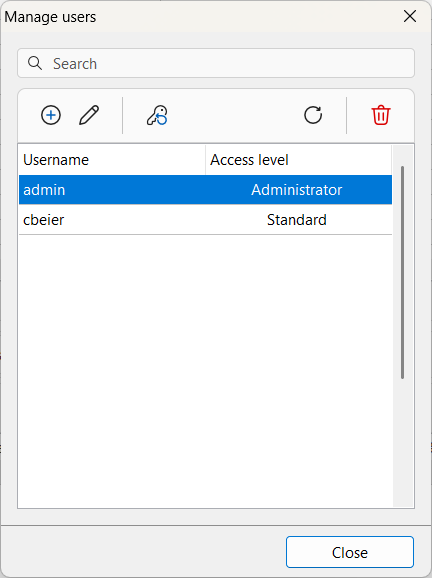
| Icon | Button | Function |
|---|---|---|
| Add | Create a new user in the current database | |
| Edit | Edit the information and permissions of the selected user | |
| Change password | Change the password of the selected user | |
| Refresh | Reload the user list | |
| Delete | Delete the selected user |
Adding and editing users
To add a new user, click the Add button . To edit an existing user, click the Edit button or double-click the user in the list. This opens the Edit user dialog:
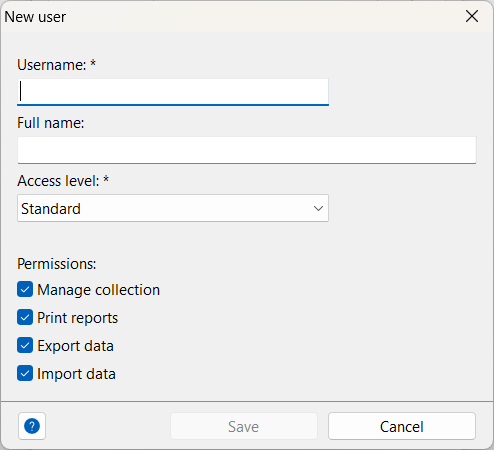
| Field | Required | Description |
|---|---|---|
| Username | Yes | Login name used to access the database and displayed in change logs |
| Fullname | Optional real name of the user | |
| Access level | Yes | Defines privileges or restrictions (see below) |
Access levels
Access levels define the scope of permissions available to each user:
| Level | Description |
|---|---|
| Administrator | Highest privileges, full access to all functionalities. Intended for database maintenance and critical tasks. Not recommended for everyday data editing. |
| Supervisor | Almost all privileges, except editing access levels and permissions. |
| Standard | Default level. Grants access to almost all functionalities for data editing. Recommended for daily use and data editing. |
| Reader | Can only view, export and print records, without editing permissions. |
| Guest | Restricted access. Can only view data, without editing permissions. Useful for external collaborators or audits. |
admin user
The admin user is automatically created when a new database file is initialized. It must not be used for trivial tasks like editing data, but reserved for administrative and maintenance operations.
Editing permissions
Permissions are defined for each access level and can be modified if necessary. To edit permissions, the user must have Administrator access. On the Users screen, click the Roles and permissions button in the toolbar above the user list. Select the access level you want to edit from the list on the left side of the screen, then check or uncheck the desired permissions in the list on the right.
Warning
Access levels must follow a clear hierarchy, where Administrator is the level with the most privileges, followed by Supervisor, Standard, Reader, and finally Guest with the most restricted access. Any newly created access levels should have permissions that fall between Administrator and Guest.
Changing a user password
To change a password, click the Change password button . The system will prompt for authentication using the current password of the selected user. Once authenticated, the Change password dialog opens:
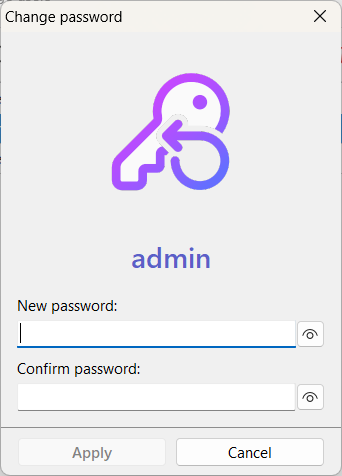
Enter the new password and confirm it. Click Save to apply the change.
Note
If you attempt to change the password of another user (not the one currently logged in), authentication with that user’s current password is required.
Deleting a user
To delete a user, click the Delete button . The system will prompt for confirmation. Click Yes to proceed.
Warning
If the user has already performed editing tasks, it is not recommended to delete them. Deleting a user may result in losing traceability of changes in the record history.
Info
The admin user cannot be deleted.
Best practices
- Assign appropriate access levels: Use Administrator only for maintenance, Standard for daily work, and Visitor for read-only access.
- Avoid deleting active users: Instead, disable or restrict permissions to preserve history logs.
- Use meaningful usernames: Choose usernames that clearly identify the person or role.
- Document permissions: Keep track of which users have rights to import/export data for accountability.
- Change passwords regularly: Encourage users to update their passwords to maintain security.
- Reserve
adminfor emergencies: Use the default admin account only when necessary, not for routine tasks.
Relation to other modules
User management is interconnected with other parts of Xolmis:
- Record history – Every change is logged with the username of the editor.
- Imports/exports – Permissions control who can transfer data in and out of the system.
By managing users effectively, Xolmis ensures data integrity, accountability, and secure collaboration across research teams.